


A1 for V1. Automating Your Sound Turnover Prep
One of the more tedious tasks sometimes asked of the assistant is the A1 for V1 timeline.


Audio Turnovers and What is an A1 for V1
One thing that has been requested more frequently over the past couple of years is the A1 for V1 (my term; there is probably an official name for it somewhere) sound turnover. When editing dialogue, many offline editors will choose alternate takes or roll over audio from the previous shot on a timeline. This can pose a problem for the dialogue editor, who often has to spend a long time trying to trace back through the sound files to find the original recorded audio. For this reason, many dialogue editors have requested a timeline of the final locked cut with the correct recorded sound on the A1 audio track. Doing this manually (which I have done) is both a long and slow process. This macro, although far from perfect, really helps break the back of the work.


A Word About Keyboard Maestro (for Those Who May Not Know)
Keyboard Maestro lets you create custom shortcuts and automations, known as macros, for a mac. These can range from very simple tasks (for example, I have a simple macro which writes out the date for me “2024-01-29 15.43”) right up to more complicated automations like this one.
For anyone who is interested in trying, there is a free trial period. For those on PC there are alternatives such as AutoHotKey.


Before you Start: Preparing your Keyboard
For A1 to V1 to be successful, you'll need to ensure that you've mapped the following keys onto your Avid keyboard:

Select V1 - Mapped to ! (Shift+1)
Mark In to Out - Mapped to T
Match Frame - Mapped to H
Select A1 - Mapped to @ (Shift+2)
Splice in - Mapped to B
If you prefer to assign them to different keys than the ones I've suggested, you'll need to adjust the sequence of events within the Macro.
It's important to note that macros consist of a sequence of keystrokes, and any interruption (like the computer saving something) can disrupt the entire macro. Therefore, it's highly recommended to keep the "cancel all" macro close at hand whenever you're using A1 for V1. Additionally, start slowly and gradually increase the interval times as you become more comfortable.

Before you Start: Cleaning up the Sequence
Before we use the macro it’s best to clean up the final sequence. Make a copy (always make a copy!!!) of the sequence and strip off all bar the V1 track. Now add a single mono audio track A1.
To prepare to start click ⌘A to deselect all tracks. Make sure that you have selected the timeline.


Run A1 for V1
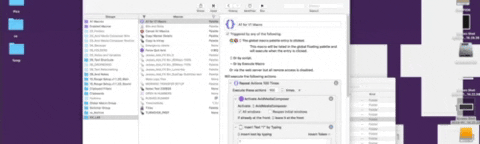
A1 for V1 runs the following command loop:
Select V1
Select In to Out
Match Frame - This matches back to the source clip, placing an in point in on the source clip
Tab Tab - This gets you from source window back to the timeline
⌘A to deselect all
Select A1
Splice in - This cuts the audio into the premarked in to out points
⌘A to deselect all
We are now back to the start of the loop and we begin again.

Changing the Settings
It’s worth trying this out at a slower speed at first and then decreasing the gaps between each action once you know that the system is up and working for you. You can also change how many times the loop loops by setting it within the A1 to V1 macro. I usually start at 20 loops and then increase to 50 once I know it’s working ok. Always keep the Cancel All macro close at hand in case there is a glitch.

Most weeks I share some additional bits with my subscribers including downloads of many of the tools that I’ve built. This week I’m providing it free with the post itself but if you wish to download in future, please sign up to the newsletter. It’s fully free of charge and helps me know who’s interested.