


The Humble Screen Insert
One of the tasks frequently assigned to an assistant editor is to temp comp inserting content onto a TV screen. Here is my method for doing this.


VFX, the Assistant and the Temp Comp
There are various degrees of VFX needs in a modern drama production. Like all other aspects of the edit, editors have differing expectations regarding the level and quality of visual effects in an offline cut. Some editors prefer to work roughly, saving the visual effects for the later stages of post-production and concentrating solely on the edit and the drama. Other productions involve VFX editors early on to handle all visual effects needs.
Whatever the expectations of the editors or the production, it is increasingly important for assistant editors to have at least a basic visual effects knowledge and the ability to create temporary or rough work in Avid (or other NLE). For any aspiring assistant editor (or editor), a fundamental knowledge of how to create a workable facsimile of the desired final VFX is essential. In the industry, this is known as a temp comp.
Like many tasks an assistant or editor performs during an evolving cut, temp comps are always a balance of accuracy and flexibility, especially in the early stages of the edit when there are many moving parts. For this reason, I try to do as much of this work within Avid, using elements that I know I can easily tweak and change.
Of the temp comps most frequently called for by a production is the screen insert. I have done many in my time and have worked out a method which is relatively fast but quite accurate. Here is a run through of how I do mine…

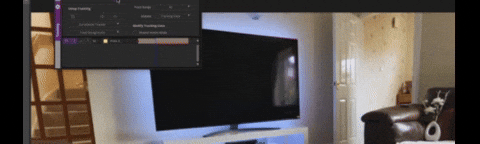
Overmapping the screen
The first thing I do is overmap the screen insert to the area where the screen will be. On layer 1, I have the shot with the television. On layer 2, I place the screen that I am going to map. Then, on layer 3, place layer 1 again and use a key or Animatte to cut out only the section of the television screen that is needed. I find it easier to integrate something into the scene by at first adding too much and then using the keying or animatte tools to add back in a portion of original plate back in over it.

Using a grid
I always start by using a grid. I find it easier, as it gives me a much better idea of how well the screen lines up with the plate you are compositing it into. Once the grid is working, I step inside the nest created on V2 and add my screens and elements over the image.
Using the corner pin option in the 3D Warp tool, I extend the four corners of the grid so that they are in the correct position for frame one of the comp.

Tracking
Rather than tracking all four corners for the entire shot, I find that, nine times out of ten, if you corner-pin the four corners on the first frame and then use a simple one-point tracker, you can get 99% of the way to a good track. You can then use keyframes to animate the corners so that they work with the television.

The Nested Full Screen
Once you have tracked in the grid and added back in the additional bit of the television that screen on layer 3, you can now go about getting your screen elements together. To do this I can now step inside the “nesting” of the 3D Warp of Layer 2 layer up the elements that I want to see on this screen. So I can add in my screen element but also add on top of it any other elements, such as graphic elements for news, and also use resize tools to help position the element better on the screen. This allows you to have multiple elements on the screen and easily tweek them or to swap out or update elements here as the show progresses.
Another positive about this method is that it allows me to postion the elements that I want in the screen or to tweek any of these elements quite easily. Essentially, everything inside the nested layer is a full screen element, so you can move them around or layer them up with resizes, colour corrects and adding elements such as noise or scanlines.
I have a layer that I refer to as budget scanlines which are simple scanlines which I add on the very top layer of any tv screen and dial in with a very low opacity. This helps sit any added element into the tv a little bit more.
Another very important aspect of this method is that it is relatively easy for an editor to tweek the screen content without ruining all of the work that you do. They can easily cut new elements in by jumping inside the nest and if they choose to shorten or lengthen the clip, all that is needed is to retrack the screen and possibly adjust a few key frames.
