The Playout Document
The Playout or Continuity document is increasingly being requested to accompany each export of the cut. I had a go at automating the process.
The Playout/Continuity Document
These days, an increasing number of studios and producers are requesting a "continuity" or playout document for each episode. This document typically includes a list of all the scenes, a synopsis of each scene, and its length. Historically, these documents have caused frustration (especially for trainees, who usually get lumped with it at the end of the day) and so I set myself the task of making this easier to produce.
Part 1: The Episode Spreadsheet
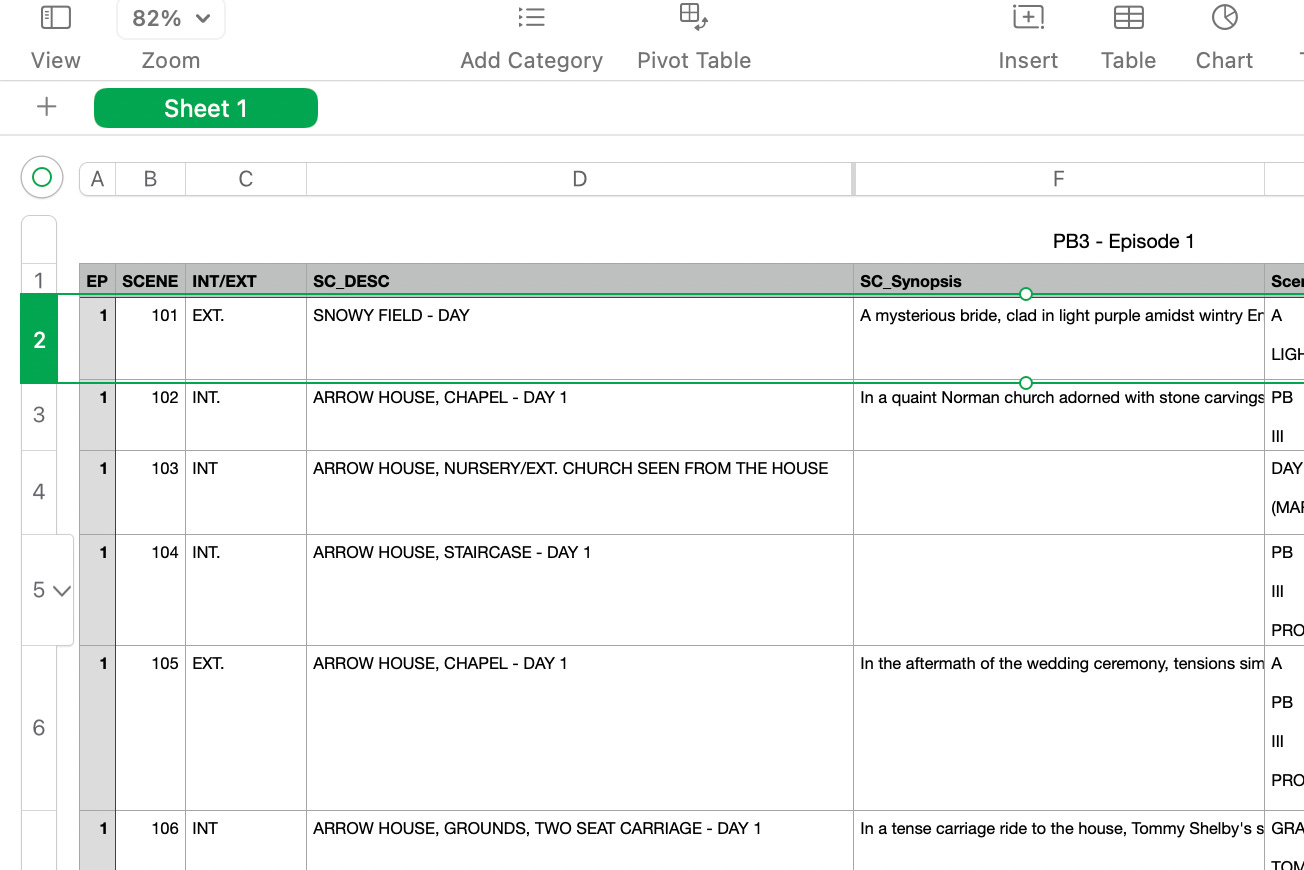
I created a spreadsheet for each episode, featuring columns for the scene number (formatted as 101, 102, 103, etc., to include the episode number at the start), scene heading (extracted from the script, e.g., INT. HOUSE. DAY), and a synopsis or breakdown of each scene. An interesting experiment I recently conducted involved feeding the text from each scene of the script into ChatGPT and asking it to generate a one-line synopsis. I found this approach very efficient, though I should note that I wouldn't use it for anything commercial or not already in the public realm.
Part 2: The Markers List
Once the episode is finished and ready to export, I used Avid Markers to tag the first frame of each scene in the cut. Assigning each marker a name corresponding to the scene; 101, 102, 103 etc. Subsequently, I exported only these markers (utilising the "export selected markers") to generate the Avid Markers text file.
WOODZ 10:00:00:00 V17 blue TITLE CARDS 1
WOODZ 10:00:06:11 V17 blue 101 1
WOODZ 10:01:32:17 V17 blue 102 1
WOODZ 10:03:10:17 V17 blue 103 1
WOODZ 10:03:57:13 V17 blue 104 1
WOODZ 10:05:34:20 V17 blue 105 1
WOODZ 10:05:50:02 V17 blue OPENING TITLES 1
WOODZ 10:07:02:04 V17 blue 106 1
This file is a basic .txt file formatted with tab spacing between each section, including User, Timecode In, Video Track, Marker Colour, and Note. The challenge I encountered here was to generate both an in and out point from only the available in point on each line. Additionally, I aimed to devise a method for calculating the duration of each scene in minutes and seconds.
USER	TC_IN	TC_OUT	TRACK	COLOUR	NOTE	LENGTH_FRAMES	LENGTH_MINS_SECS	FILENAME	CREATED
WOODZ	10:00:00:00	10:00:06:11	V17	blue	TITLE CARDS	161	00:06	OOS_Playout_v1.1_240131	2024-02-01 08:49:28.264392
WOODZ	10:00:06:11	10:01:32:17	V17	blue	101	2156	01:26	OOS_Playout_v1.1_240131	2024-02-01 08:49:28.264392
WOODZ	10:01:32:17	10:03:10:17	V17	blue	102	2450	01:38	OOS_Playout_v1.1_240131	2024-02-01 08:49:28.264392
WOODZ	10:03:10:17	10:03:57:13	V17	blue	103	1171	00:47	OOS_Playout_v1.1_240131	2024-02-01 08:49:28.264392
WOODZ	10:03:57:13	10:05:34:20	V17	blue	104	2432	01:37	OOS_Playout_v1.1_240131	2024-02-01 08:49:28.264392
WOODZ	10:05:34:20	10:05:50:02	V17	blue	105	382	00:15	OOS_Playout_v1.1_240131	2024-02-01 08:49:28.264392
WOODZ	10:05:50:02	10:07:02:04	V17	blue	OPENING TITLES	1802	01:12	OOS_Playout_v1.1_240131	2024-02-01 08:49:28.264392
Part 3. The App
The Playout App was subsequently designed to integrate the two downloads: the Avid Markers List and the Episode Spreadsheet. It converts the markers list into a spreadsheet with the accurate timings and cross-references them to generate a new spreadsheet consolidating scene number, location, synopsis, timecode in, and scene duration into one document.
Currently, this app functions solely on my laptop, but I'm in the process of developing an online version accessible to everyone. If you're interested in using this tool, please consider subscribing to the newsletter. Subscription is free of charge and I provide additional articles and downloads to subscribers.
Part 4: In Design
One area I need to dedicate more time to is integrating spreadsheets into Adobe InDesign. However, I took this as an opportunity to explore the "data merge" option in InDesign. For this basic version, I followed these steps:
Created a template for scene information, featuring a simple text box for Scene Number, Location (SC_Desc), Synopsis, Timecode In, Scene Length, and a dividing line.
Opened the Data Merge panel (Window > Utilities > Data Merge).
In the top right corner of the panel, clicked on the menu and selected "Select Data Source," then located the playout file.
Assigned each column to a text box. A preview option allowed me to adjust the text box sizes and fonts.
Once satisfied with the template, return to the Data Merge menu and select "Create Merged Document." Here, you can preview and adjust the spacing for each template scene. Upon confirmation, a new document is generated containing all the scenes.
There's much more functionality to explore in InDesign, including the automation of adding images for scenes. I look forward to delving deeper into this in the coming months.
More to Do…
I'm enthusiastic about the potential of this tool and eager to explore its development in the coming months. There are intriguing challenges ahead, such as how to group multiple scenes together and automate signaling when a scene has changed from a previous playout. Hopefully I can release a public beta version to my subscribers very soon, as I value your feedback on what's working well and what could be improved.


Thank you Shane!!!